Recording yourself giving a talk.
Overview
A typical talk consists of an individual explaining or describing something, usually while clicking through a slide deck that contains supporting imagery.
Seeing the individual is optional, but in my experience most people appreciate to see the person whose voice they're hearing. Particularly those of us who are hard of hearing will thank you for it.
Having a slide deck is optional. Your explanation can just be
so good you don't need images, or you prefer to draw something interactively on something that's within view of the camera.
You
will need to have at least one of these, otherwise what you're doing is a podcast, and I'm sure there are better tutorials on that to be found elsewhere.
The description below is for the most straight-forward approach to recording yourself, using a laptop, with the intent of sending it to a video person who can then edit it out to a nice recording.
Prerequisites
So for this guide you only need 1 bit of tech, which is your laptop. I'm assuming it has a built-in webcam and microphone. Failing that (or either webcam or microphone are defective) you can get USB versions of either for not a lot of money typically.
If you're going to record slides as well as yourself on a webcam, you should record both at the same time.
Recording your slides
Start by asking what resolution the organization prefers. Most will say 1920x1080 which is standard, Full HD format. They shouldn't care about the video file format/extension so don't worry about that. Try to set your laptop's screen resolution to the specified size. If your typical resolution is higher, this may look weird on your screen. If your laptop isn't capable of this resolution (1366x768 has been a very common resolution on lighter laptops), try to connect it to a second monitor or your televsion, set that screen to the requested resolution and record that instead. In either case, when you change the resolution of your screen, your presenting program might reorganise things on the screen, so go through it one more time to make sure things look the way they should. If you can't/won't change resolution, that's fine, but then the conference will need to scale your slide video. Scaling down will make the video sharper, but smaller details will be smaller still, potentially to the point of not being readable. Scaling up will make the image fuzzy. In that case it's wise to include your slide deck itself when you send your recordings to the video person. If they have enough time they might be able to render your slides at their resolution thus retaining the detail.
For recording your slides, both Windows and Mac have built-in screen recording functionality. On Mac it's Shift-Command (⌘)-5 and on Windows 10 it's Windows Key + G. In both cases controls will appear that will allow you to record your desktop. Once you're done recording, the Mac will show a thumbnail of the video in the bottom-right corner of the screen. Windows will have saved your video in '%USERPROFILE%\Videos\Captures'. When you record,
be sure to include audio.
Recording yourself
For recording the webcam, again both Windows and Mac have built-in webcam recording functionality. On Mac the program is called Photo Booth (select video from the lower-left corner) and on Windows 10 it's the Camera app. Here as well,
be sure to include audio in your recording. With webcams you don't get a say in the resolution, so whatever it can give is what we'll use. Here as well, the file format/extension shouldn't matter - if the file plays in
VLC it should be fine.
Audio in both videos?
Yes! It helps immensely when
both the slides and the video have the audio included. When you're done recording you're going to end up with 2 videos which need to be synchronized such that when your camera image is paired with the slide image, the visible slide is in fact the one you're talking about. This synchronization can be made in 3 ways:
1. When the audio is available in both videos, all us video people need to do is align the audio tracks which are very distinct and recognisable. Some programs have tools for this specific purpose. This is by far the method that is least demanding on the time of the video person.
2. When the audio is only in the slide video, the video person needs to work out based on educated guesses what might be a significant audio spike (like, a cough or you accidentally dropping something near the microphone) and look for it in the video. This narrows the synchronization down to about half a second. Next the video person needs to make small adjustments in a section where you speak to make the lip movement line up with the audio properly. This is the second-best option, and video people will sing songs to your glory if you can clap your hands loudly somewhere in the video where we can see your hands closing in on one another in the camera footage. Do this at the start or tell us the time where you did this.
3. When the audio is only in the camera video, the video person tries to hear when you go from one slide to the next. If your mouse or clicker is loud or one can tell from the video when you click to swap slides, that can work well enough. Failing that, the video person needs to listen to your talk and work out based on what you're describing which slide you're on. This is immensely time consuming! Here too you can make life on the video person simpler by having a part somewhere in the video where you say "I'll now switch to slide X" while holding up your mouse / clicker and in a move that is clearly visible on the webcam footage tap the button to actually switch the slide.
4. When neither video has an audio track, and instead the audio is a separate file that you submitted, expect a voodoo doll with your name on it to get ordered along with some very sharp pins. The video person will first do the trick described in #3 to make the webcam video align with the audio, and then do the trick described in #2 to sync with the slides. This will be spectacularly time consuming and your video person might ask the organizer to request a backup speaker to take your place because that'll be quicker. No matter the outcome, you will be remembered and you
really don't want that.
As you can see, having the audio in both video files makes things
much easier on the video person, and it shouldn't change anything for you, so pretty please, include audio in both. If the machine doesn't allow it (because the other program is already recording from the microphone, say), please follow the advice listed for when the audio can only be in one of the files, and when you submit the video tell the video person at what timestamp in the video you did the thing to help synchronization. Thank you!
Improving
The above bits is the bare-bones nuts and bolts of the operation. It'll make you end up with 2 files which you can now send to the organizer. However there are a number of things you can do to make these videos nicer to watch. Most of this starts with a short test video, so before you do anything else, start the webcam recording, stand in front of it and introduce yourself. Like, literally, just say "Hi! I'm so-and-so and I'd like to talk to you about X" then go back to the laptop and stop the recording. Now look
critically at the what you see. Below is a list of things you could consider doing that might improve the visual of your video. Doing everything doesn't make your video great and doing the exact opposite of all this doesn't make your video rubbish. Some are more impactful than others and some might make you feel very uncomfortable. The only one who knows what works for you is you, so try these suggestions and see what makes you feel the most comfortable while also making you look your best.
- Get as much light on you from anywhere behind the camera.
Don't record yourself with a bright window behind you - instead, face the window and put your laptop between you and it. Turn on all the lights. Even during the day - turn them on and see if it makes a difference. Webcams tend to be very poor at filming darkness, so have good light in there. Also, if you're relying on the daylight to be enough, be aware that if it's a cloudy day, the amount of light that hits you can be quite variable and your webcam will adjust for it, and usually not in a very good way. A mirror behind you tends to be a very bad idea too.
- Look into the camera.
Not doing so is similar to having a 1:1 chat with someone and not looking at them. It's perceived as a lack of interest on your part for the viewer. It's fair game when you need to focus on the screen to give a demo, but when you're speaking you should be looking in the general direction of the camera at least for the bulk of the time.
- Know what's going to be in the image around and behind you, and make sure you want it there.
You're presenting not just your topic, but also yourself. Whatever your background is going to be, try to not have it be something you don't want to be associated with. Some people like to have their framed credentials behind them. Others prefer to show off their impressive bookshelf. Pictures of real people can be problematic in a multitude of ways, so best tuck those away. Make sure nothing reflects light back at the webcam. Backgrounds with lighter colors are preferred over darker ones because most webcams struggle with them.
- Stand up.
As opposed to sitting down, it's better to be standing when you present. It's better for your voice, and you can move your hands more freely to convey meaning.
- Speak up.
Talk as if you are addressing a full room, and the person in the back needs to hear you too. I'm not saying you should shout, but certainly try not to mumble. If English isn't your first language, it often helps people to understand you better when you talk slower, and more specifically, don't...talk...slower but t-a-l-k s-l-o-w-e-r.
- Have the webcam at eye-height.
It's a simple fact that faces look more natural to others when you're looking straight at them, so find a way to elevate your laptop until the webcame is at eye-height or a little over. I've seen many different ways to do this and at the bottom of this page I'll show a few pictures of how people tried to do it. Most common is a stack of books under the laptop or even putting a chair on the table to get enough height.
- Remove background noise.
Listen to your recording and pay close attention to the bits where you are silent. What do you hear? This can be anything from the kids playing outside, to the gentle hum of the fridge, to your parakeet deciding now is a good time for a serenade, to the hissing of the air conditioning or the ceiling fan blowing air down, to the person in the other room blasting their music just a little on the loud side. See if you can reduce these sounds in any way. You probably shouldn't turn off the fridge but you can probably deal with the air conditioning being off for an hour or two. The more background noise you can remove, the easier it will be to have good audio in your recording. The main thing is that your voice is, by a good margin, the loudest thing on the audio track of the video.
- The only thing moving is you.
Our eyes are naturally attracted to things that move and for your presentation it's best if that's only you. If you have anything that may move autonomously (a bird in a cage, a clock, a giant fish tank, one of those balancing toys that moves back and forth for ever, ...) do everything you can to NOT have it in frame.
- Zero distractions.
Turn off all notifications and alarms, and make sure your house mates know you're doing this at a certain time and they should leave you alone until you're done. I'm talking about your phone buzzing or ringing, pop-ups and blips from social media things or messengers, and yes, even the odd toddler excitedly running into the room to give you a hug. Lock the door(s) if you can.
- Remove the fluff from your text.
When you listen to yourself, how often do you say "you know", "like", "so..."? "Ahhh", "err" and "um"? "Of course"? "Naturally"? "Obviously"? You typically use these words because you can't think of the correct word to use, how to phrase something, need to indicate to the other that you're still talking so please don't interrupt just yet, or to gauge the reaction of the listener. However, you're prerecording yourself - you can take as long as you want, nobody will interrupt you, and there isn't an audience to give you feedback yet. If something is obvious, common knowledge, then assume your audience knows it and skip over it. If you're not sure the listener knows about something, reference a resource for more info on the subject ("THING is outside the scope of this talk but PERSON did a great talk on it at EVENT, the link to the recording of that talk is at the bottom of my slide"). So calm your nerves, take a deep breath, think about the words you want to use for this next bit, and try again. Nobody's expecting you to completely exclude these words from your text, but less is better.
- Try not to visibly fidget.
Some people have this very visible thing they do when they present. Continuously scratch your nose, comb your hair with your fingers, fiddle with your necklace, rotate a ring on your finger, and even outright play with some gadget specifically designed for this purpose. It's of course perfectly fine for you to do this, but try to do it outside the visual frame of the webcam.
- Don't try to make the perfect 'take'.
There's a video person with the organization who will edit the videos you provide. So if you make any sort of mistake, simply redo that bit without stopping the recording. If you stop and then restart the recording, the video person will need to repeat the synchronizing of the webcam and the slide video which, I can assure you, becomes very annoying. So instead, record everything until you have at least 1 good rendition of each part, then grab a piece of paper and look over the video you made. Write down the times in the video from where to where things need to be removed. If there's anything on screen while you were recording that you don't want to see there (pop-up during a demo, accidentally switching to your email client instead of the presentation, saying the name of someone you shouldn't, cursing when you feel it's better if you didn't, etc), write that down with the times too. When you send in your videos, include your remarks so that the video person knows which adjustments need to be made. Us video people can do amazing things to your recording, but we need that list you make to instruct us and the timing you provide here is crucial in making sure we do what you want.
- Don't wait until the very last moment to send in your video
When you prerecord your video, your first question to the organizer should be "What's the deadline?". However, if you deliver your videos at that exact time, it means whatever you submitted is what will be used with, at best, minimal adjustment. The organizer will have a video person on staff to put some work in making your recording the best they can make it, but that requires time. If you send your video in early enough there's a good chance that video person will be able to show you what the video will look like and you can then decide to redo parts or notice that tiny mistake you made that might be edited in some way before the video becomes public.
Examples of what your setup might look like
To give you some ideas on how various people chose to set up their space for a talk or interview, I grabbed some images off of twitter and will point out for each what they're doing to make their presentation the best it can be.
Click on the image to see a bigger version of it or the source link to read what these people had to say when they presented their setup.
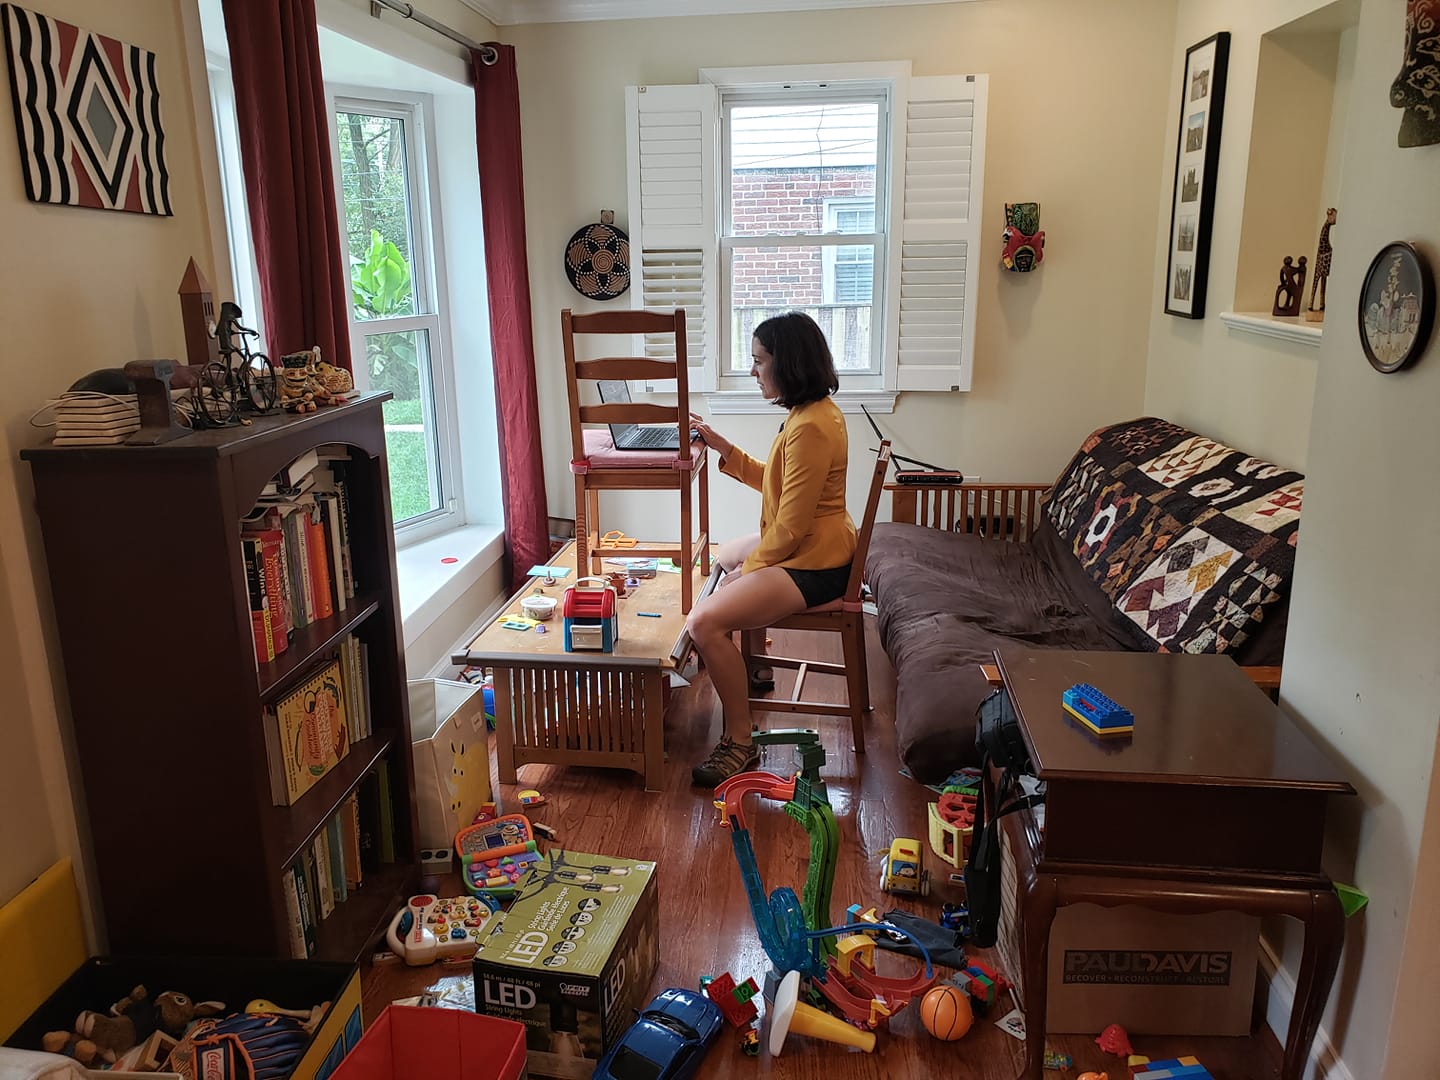
| Wearing what feels good but only showing that which looks professional.
Lots of natural light on her face from the window behind the laptop.
The overhead room light is on.
Webcam elevated to roughly eye-height via a chair.
Calm, homely background that is nice and light.
Shoved all the toys to the side - this is mommy's room now and she has to work.Source |
| Not enough light coming in from the outside, hence the big, bright light behind the laptop.
Elevate the laptop best you can using an ironing board.
One of the ironing board's feet is clamped under the bed to stabilize it so you can type on the laptop without making the viewer seasick from the wobble.
If stability was less of a concern the book on the bed could've been used to prop the laptop up even more but it seems they instead lowered the seat to compensate.Source |
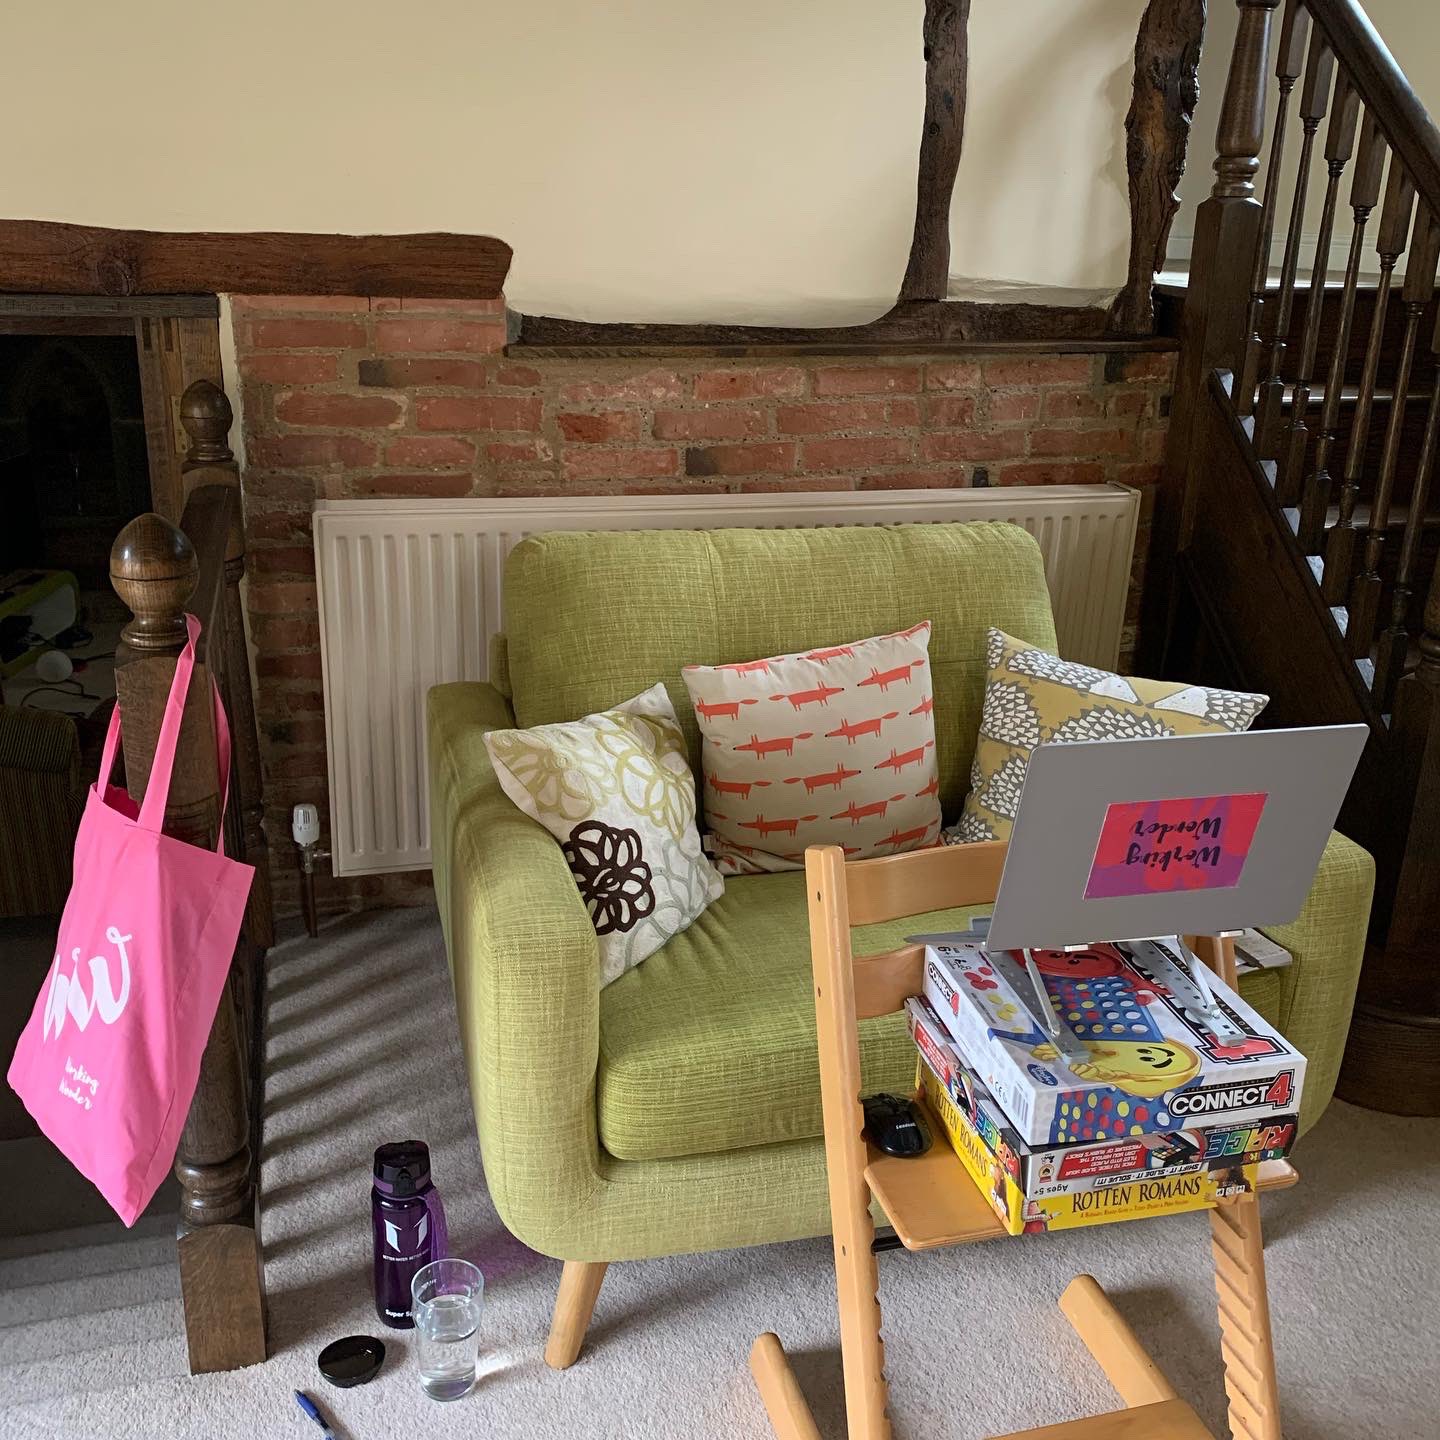
| Calm, light background
Elevate the laptop using a special stool, some boxes and a laptop stand.
It's not a very bright part of the room, so they should try to get more light on the person in the chair before they start. You can see natural light comes from the lower-left but that leaves the other side lacking.Source |
| Big photography light diffuser umbrella to brighten up the room uniformly so you don't end up staring at a bright spot for long.
Big elevation of the webcam using an ironing board and a stack of books, plus something cobbled together to hold the device in place at the right angle.
As this light is quite powerful, it's set back a bit to not have the recording device cast a shadow on the person. The alternative is to elevate it more.
At ~60 euro a piece there are likely cheaper options for brightening the room, but if you already have one, then by all means use it.
This is a very powerful light which will get quite hot. That means it'll heat up the room and likely has a small fan in it which can cause background noise.Source |
| Again, good elevation of the webcam using a stack of books.
The light is in front of the webcam, but enough to the side to not be in the shot.
A concern here is the brightness of the bulb. Yes, you want lots of light, but it's painful to look at the camera for any length of time.
Maybe get a second light and put one on either side of the laptop, and preferably a bit further away from it?Source |
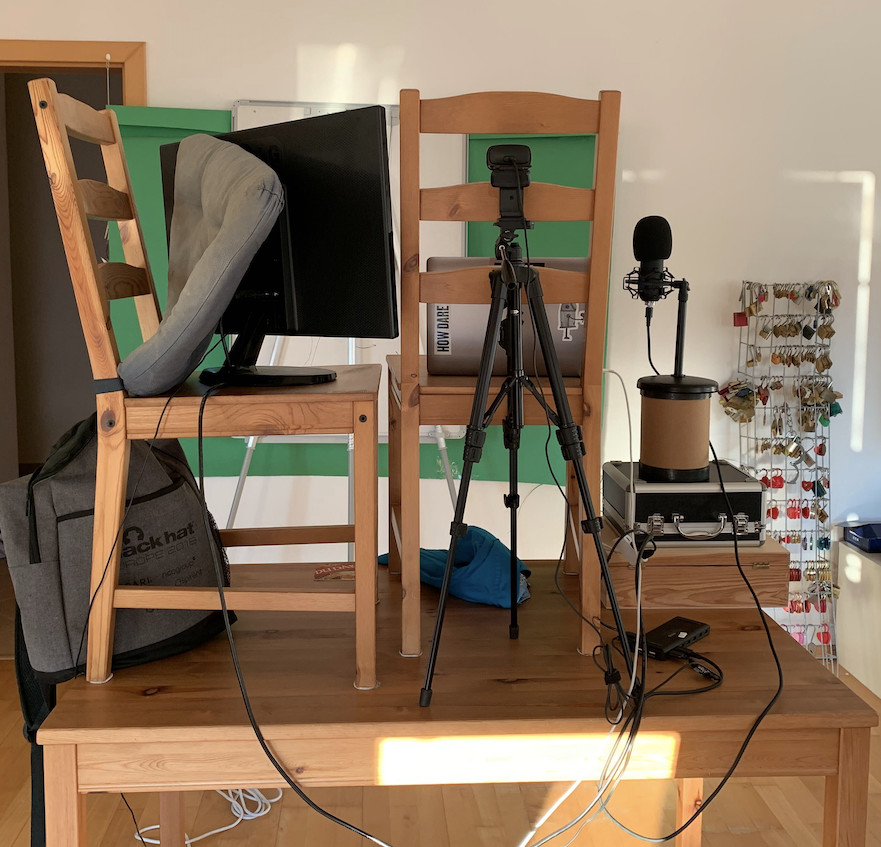
|
If you have it, use it! A nice USB microphone will almost always be better than the one built into the laptop.
Also, separate webcam, on its own tripod to get elevation.
Elevate your laptop by placing the laptop on a chair on a table - they're not using the built-in webcam, but it would look weird if you need to always look down to see your own screen.
Secondary monitor allows the use of "presentation mode" - where you see a small version of the current slide, the next slide and your personal notes about the current slide.
Calm, green screen background which they thought they could use to easily replace with an image, but in the end chose not to.
The outside light is directly in front of the speaker, behind the laptop, giving lots of natural light. Be careful with direct sunlight on you though!Source |
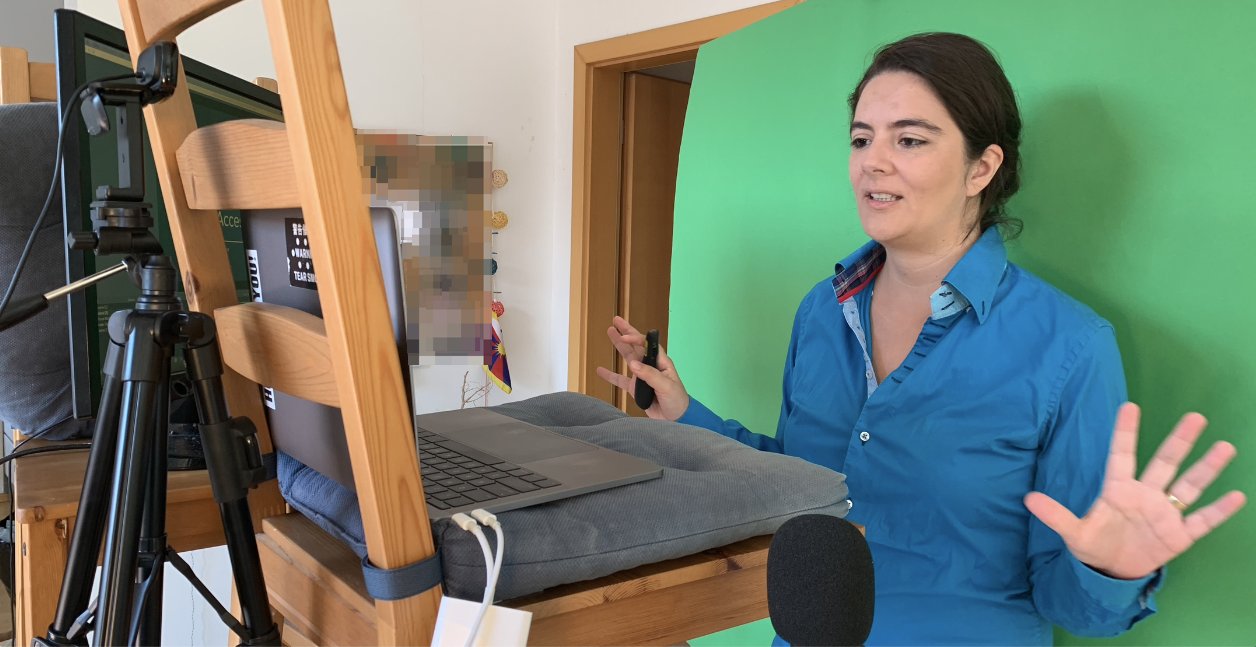
And here is the 'action' shot of her giving her talk.
|